
WARDOGS Control Zone, Hot Zone & FOB Building Guide
How the WARDOGS Control Zone and Hot Zone score, plus hammers, Build Supplies, FOBs, repair drills, C4 and supply logistics, using official patch-note costs only.
WARDOGS is not won by kills. It is won by bodies standing inside one randomised Control Zone, and the team that keeps the most players alive and present there the longest takes the match. Everything else in the game, from the hammer in your quick slot to the fuel can in your backpack, exists to put more of your team in that zone and keep it there. This guide explains how the mode scores, why the Hot Zone matters so much, and how the building, FOB and logistics tools support a push.
Every rule and number below comes from official BULKHEAD Steam announcements (the TOP QUESTIONS post and the Season 1 changelog) or from the in-game Equipment Vendor tooltips we captured in the Firing Range. Where the sources are silent, for example the size of the FOB radius or where zones tend to spawn, we say so instead of guessing. How the data was captured is documented on our methodology page.
How the Control Zone scores
The mode is inspired by the ARMA King of the Hill mod, and BULKHEAD says its design team worked with the original mod creators. Per the official TOP QUESTIONS post, three teams fight to seize a randomised 2x2 km Control Zone inside a 256 km² map. Scoring is a head count: the team with the most players in the zone earns points, and the first to 100 points wins. Because the zone moves from match to match, no two games play out the same, and you cannot memorise a single fortress position.
That rule changes how you should value your life. A kill removes one enemy from the count for a while; a revive puts one of yours back into it immediately. A truck full of teammates arriving at the edge of the zone can swing the count more than any single gunfight. This is why the developers describe teamplay as rewarded rather than just encouraged: revives, transport, kills and spotting all earn cash.
The Hot Zone: double count, double cash
Inside the Control Zone sits the Hot Zone, a shifting sub-zone. Players standing in it count as double towards their team's player count, which the developers call match-swinging, and it also pays double cash. Holding it is both the fastest way to score and the most profitable place to play. It is also the place every other team wants, so expect it to be the most contested ground on the map.
Build your kit before you drop
Pick weapons, attachments, armor and equipment to see total weight, cash per life and the unlocks you still need, then save the kit for next time.
- Weight & cash per life
- Unlocks you still need
- Saved kits

Building: hammers and Build Supplies
Construction and destruction are core pillars of WARDOGS. Every structure needs two things: a hammer, and Build Supplies, the resource the vendor describes as required to build all buildables and usable with any hammer. The hammers belong to the Support track, and the size of the hammer decides what you can build and how fast. Browse all of them on the equipment page.
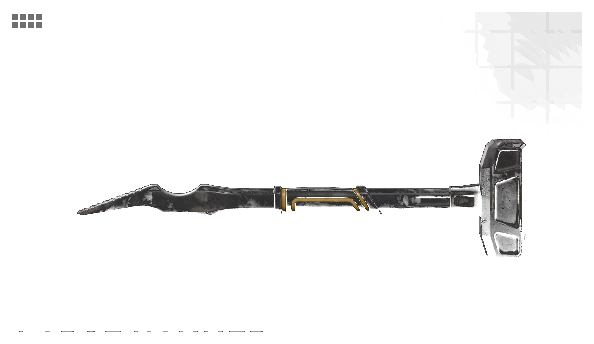
| Hammer | Slot | Builds | Speed | Weight | Support level | Official cost |
|---|---|---|---|---|---|---|
| Small Hammer | Quick Slot | Small buildables only | Slow | 0.32 kg | Default | Not published |
| Medium Hammer | Spec. Item | Large and basic buildables | Moderate | 1.23 kg | 3 | Unlock $25,000 (was $10,000) |
| Large Hammer | Spec. Item | All buildables | Fast | 3.18 kg | 8 (was 7) | Unlock $75,000 (was $25,000); vendor $2,400 (was $1,600) |
The Small Hammer is unlocked from the start and sits in a quick slot, so every player can carry one alongside a full kit. Its tooltip lists what it handles: sandbag walls, hedgehogs, camo tents and barbed wire, both to build and to repair. The Medium Hammer moves up to large and basic structures, while the Large Hammer can build and repair every structure in the game at the fastest speed. Both bigger hammers take your Spec. Item slot, so carrying one means you are the squad's builder for that life.
Build Supplies are a Resource item at 0.02 kg each, so the limit on how much you carry is usually backpack space rather than weight. We have not captured how many supplies each structure costs, and the full list of buildables beyond those named on the hammer tooltips is not in our data yet. BULKHEAD has also said you can construct loudspeakers to blast faction propaganda over proximity chat.
Forward Operating Bases (FOBs)
A Forward Operating Base is bought at the vendor. The Season 1 changelog tripled its price from $2,500 to $7,500, again so that it is more of a choice. A FOB matters because three logistics resources only work inside its radius: Ammo Supplies reload buildable weapons, Fuel Supplies refuel vehicles and Mechanical Supplies repair them, all at friendly-built bases. Each weighs 0.03 kg and is unlocked by default, but none of them does anything until your team has a FOB down.
| Item | Weight | Does | Needs |
|---|---|---|---|
| Build Supplies | 0.02 kg | Builds all buildables | Any hammer |
| Ammo Supplies | 0.03 kg | Reloads buildable weapons | FOB radius |
| Fuel Supplies | 0.03 kg | Refuels vehicles | FOB radius |
| Mechanical Supplies | 0.03 kg | Repairs vehicles | FOB radius |
| Fuel Can | 5 kg | Refuels vehicles manually, limited capacity | Refill at a Refuel Point |
- 1Pick a spot near, not in, the zone
Your FOB exists to feed the Control Zone. Since zone positions are random, decide once the zone is known and the route to it is clear.
- 2Bring a builder and supplies
One player carries a Medium Hammer or Large Hammer plus a stack of Build Supplies; everyone else can still carry a Small Hammer for sandbags and wire.
- 3Place the FOB
Buy the Forward Operating Base at the vendor for $7,500. Treat it as a team investment, not a personal one.
- 4Fortify it
Throw up sandbag walls, barbed wire and hedgehogs to slow infantry and vehicles, and camo tents to hide what you have built.
- 5Stock the logistics
Drop Ammo, Fuel and Mechanical Supplies inside the radius so buildable weapons can reload and vehicles can refuel and repair without driving back to base.
- 6Keep it alive
A FOB that goes quiet is wasted cash. Rotate someone with a hammer to repair it between pushes.
Vehicle repair and refuelling
Transport is a paid teamplay action, and a broken truck puts nobody in the zone. The Wrench (1 kg, quick slot, unlocked by default) repairs all vehicles slowly. The Light Drill (1.5 kg, Support 1) is a moderate-speed battery tool, and the Heavy Drill (6.9 kg, Support 28) is the fastest repair tool in the game. Both drills need batteries: the standard Battery is 20V-5AH at 0.63 kg, and the High Capacity Battery (WARDOG level 45) is 20V-15AH at 2 kg. The same batteries charge the Medic's Defibrillator. For fuel away from a FOB, the Fuel Can (5 kg) refuels by hand and refills at Faction Deployment Zones. Vehicle unlocks are listed on the vehicles page.

- Heavy Drill: fastest repair speed of any tool
- Wrench: unlocked by default, 1 kg, no batteries, fits a quick slot
- Heavy Drill: 6.9 kg, a Spec. Item slot and a battery supply
- Wrench: slow repair speed under fire
Demolition: C4, IEDs and mines
Whatever you build, the enemy can blow up, and the reverse is true. The C4 Charge (0.57 kg, Support 2) sticks to anything it is thrown at and needs a Remote Detonator (0.02 kg, also Support 2). The default Improvised Explosive Device is a single-use remote charge in a quick slot. For area denial, the AT Mine (8.6 kg, Support 25) is triggered by vehicle pressure only, while the Claymore (1.6 kg, Recon 22) is motion-triggered by infantry and vehicles. Mines around a FOB's approach roads protect it from exactly the vehicles you are trying to keep out.

Signals, supply drops and crates
The coordination tools are unlocked from the start. The M18 Signal Grenade: Supply Requesting Zone emits green smoke and designates the landing spot for a logistics supply drop; the Landing Zone variant marks a purple landing zone for aircraft; the Damaged Vehicle variant marks a vehicle that needs repairs with orange smoke. Each adds a matching marker to the map. Supply crates are unlocked on the vehicle tracks: Small Armored Crate at Pilot 2, Large Armored Crate at Pilot 15 and Large Crate at Driver 16. The small armoured supply crate unlock doubled from $5,000 to $10,000 in the Season 1 changelog.
Two crate changes in the same changelog closed loopholes: the XP for selling a supply crate item worth under $75 dropped from 25 XP to 1 XP, and the supply crate purchase curve was rescaled from 25-250 down to 1-200 so low-value items are priced sensibly and cannot be abused. Also note that 155mm, 122mm and flare deployables now take up more room in your loadout. Full notes are on the patch notes page, and unlock levels on the progression page.
- Zone revealedPlan and move
Read where the Control Zone is, load trucks and helicopters, and send a builder with Build Supplies toward it.
- Early holdEstablish
Drop the FOB, fortify with sandbags and wire, and stock Ammo, Fuel and Mechanical Supplies inside its radius.
- ContestPush the Hot Zone
Feed players into the Hot Zone, where each counts double and earns double cash, and use smoke and revives to keep the count up.
- Close outDeny and repair
Repair what the enemy damages, mine the approach roads, and C4 enemy fortifications before they can reload.
Related WARDOGS pages and tools
- [Interactive maps](/wardogs/map) — Zestafona with faction HQs and the capture zone, plus Bakurani
- [Equipment](/wardogs/equipment) — medical, building, recon and explosive items with prices
- [Vehicles](/wardogs/vehicles) — every truck, helicopter and tank with its unlock
- [Backpacks, vests & parachutes](/wardogs/gear) — slots, grid size, weight and price
- [Patch notes](/wardogs/patch-notes) — every official change to prices, unlocks and XP
- [Progression & unlocks](/wardogs/progression) — every track's full unlock ladder and the XP curve
Help us maintain accuracy! If you notice incorrect stats, missing data, or any issues, your feedback directly improves the quality of our data for the entire community.
Guide FAQ
How do you win a WARDOGS match?
Three teams fight over a randomised 2x2 km Control Zone. The team with the most players inside the zone earns points, and the first team to 100 points wins.
What is the Hot Zone in WARDOGS?
A shifting sub-zone inside the Control Zone. Players in it count double towards their team's player count and earn double cash, according to BULKHEAD's official TOP QUESTIONS post.
How much does a FOB cost in WARDOGS?
The Season 1 changelog raised the Forward Operating Base vendor price from $2,500 to $7,500. Ammo, Fuel and Mechanical Supplies only work inside a FOB radius.
Which hammer builds everything?
Only the Large Hammer can build all buildables, at the fastest speed. It unlocks at Support level 8 for $75,000 and costs $2,400 at the vendor. The Small Hammer builds small structures and the Medium Hammer large and basic ones.
Are there towers or fixed objectives on the WARDOGS map?
Our sources do not describe towers, and our offline map capture shows no markers or labels. The only official objective is the Control Zone and its Hot Zone. We will add map markers once they are captured from a live match.