All Valor Mortis Bosses in Order: HP, Weaknesses & Rewards
Every Valor Mortis boss in campaign order, from General Lothaire to Entity, Voice of the Void: HP, posture, unblockable attacks, fire weaknesses, Catalyst rewards, achievements, tips and a data-built difficulty ranking.
Valor Mortis has 10 bosses spread over its 11 chapters, from a banner-carrying general on the Battlefield to a void entity that brings back the attacks of the bosses before it. They range from 1,500 to 5,000 HP, and between them they have 39 unblockable moves, the red-glowing attacks you have to dodge.
This guide lists every boss in the order the campaign meets them, with the numbers that decide each fight: HP, posture, critical damage, Stasis segments, weaknesses and rewards. Each boss also gets a short strategy and the nearest Lantern. At the end is a difficulty ranking built from the data.
Valor Mortis boss order at a glance
| # | Boss | Region | Chapter | HP | Posture | Unblockable / attacks | Catalysts |
|---|---|---|---|---|---|---|---|
| 1 | General Lothaire, the Eagle-Bearer | The Battlefield | 1. Revival | 1,800 | 500 | 9 / 18 | 10,000 |
| 2 | The Iron Marshall | Fallen Village | 3. Rendezvous | 2,400 | 800 | 1 / 8 | 7,000 |
| 3 | Sphinx, Devourer of the Unworthy | Caverns | 4. Dark Descent | 2,000 | 350 | 5 / 14 | 20,000 |
| 4 | Slaughtermill | Vale of Wrath | 5. Crime | 3,250 | — | 0 / 0 | 30,000 |
| 5 | Anna, the Bride Drowned in Tears | Cursed Hollow | 6. Punishment | 2,200 | 400 | 1 / 4 | 14,000 |
| 6 | High Justicar Aurelius, Last of the Faithful | The Outskirts | 7. Witch Hunt | 1,500 | 1,000 | 5 / 14 | 18,000 |
| 7 | Experiment 83 | The Outskirts | 7. Witch Hunt | 3,400 | 1,000 | 2 / 4 | 20,000 |
| 8 | The Orphan | University | 9. In Ruins | 4,000 | 1,550 | 7 / 16 | 40,000 |
| 9 | Captain Raphael of the Nephtis Superioris | Fortress | 10. Shackled | 4,000 | 2,000 | 3 / 10 | 50,000 |
| 10 | Entity, Voice of the Void | Entropy | Final | 5,000 | 700 | 6 / 19 | 100,000 |
General Lothaire returns at the Abandoned Church hub, but his first fight is on the Battlefield. The Outskirts is the only region with two bosses, High Justicar Aurelius and Experiment 83, both in Chapter 7. The bosses database has a page for each.
Every boss: stats and strategy
1. General Lothaire, the Eagle-Bearer
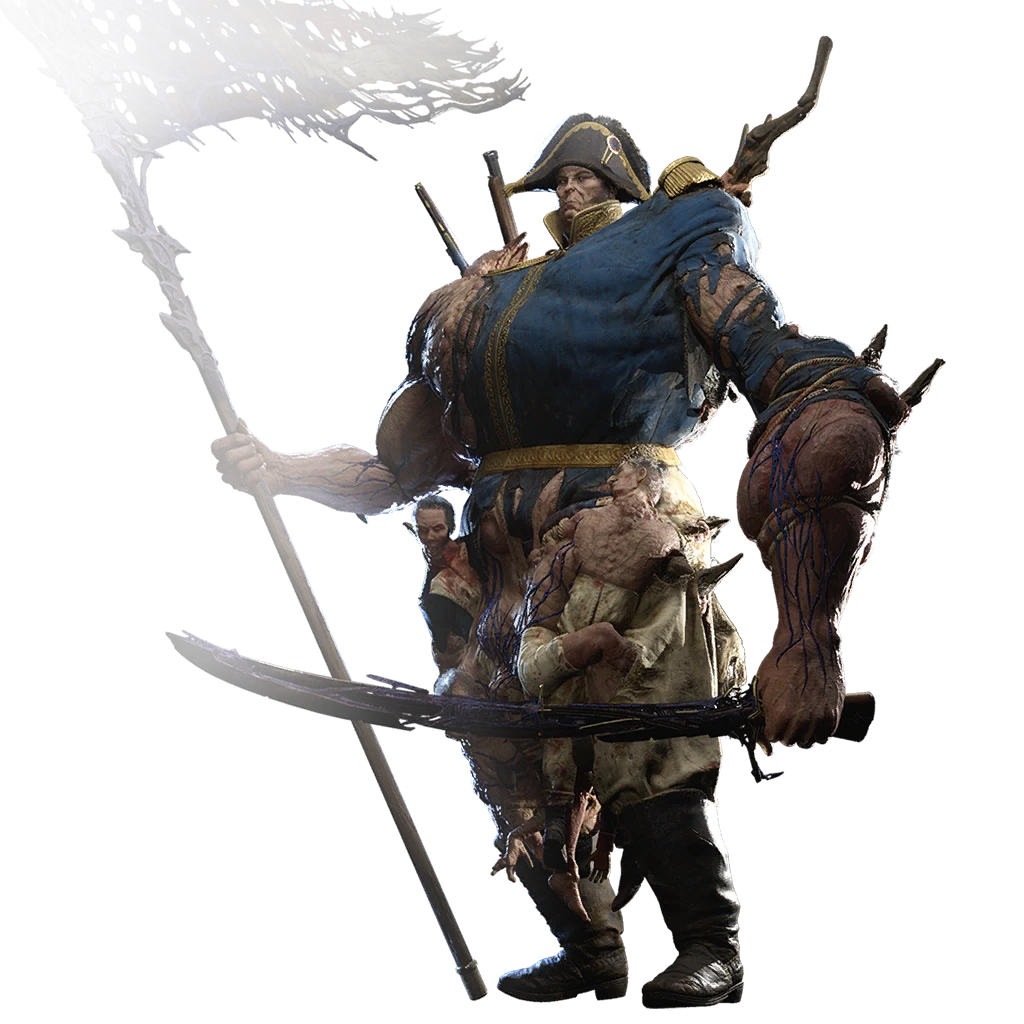
General Lothaire is the first real test of blocking discipline. In his first phase most strings (Combos 1 to 3, Swing, Spin and Slash) hit for 37 and can be blocked or parried, but Bash, Leap, the ground Spikes, the Wave and his Grab cannot, so learn to dodge those five on sight. In the second phase his combos hit for 50 and several finishers turn red. He also calls in sabre and musket soldiers; a pistol shot or two clears them before they can flank you.
He takes 40% extra damage from fire and double damage to the head, so the Fire Transmutation and pistol headshots shorten the fight, while Stasis is a poor choice (he resists half of it). His posture pool is only 500: break it and a critical attack takes 400 off his 1,800 HP.
- Where: The Battlefield, Chapter 1 (Revival); nearest Lantern Field Encampment, about 71 m away
- HP: 1,800 · Posture: 500 · Critical Attack damage: 400 · Stasis segments: 7
- Attacks: 18 damaging moves, 9 unblockable (Bash, Combo 6, Combo 5, Combo 4, Leap, Spikes, …); hardest hit 50
- Takes from fire: +40% · firearms: 0 · head: ×2
- Reward: 10,000 Catalysts · Achievement: Torn Banner (28.3% of Steam players)
Full move list, phases and hits-to-kill: General Lothaire boss page.
2. The Iron Marshall
The Iron Marshall is a pure melee bruiser with only eight moves, but they hit harder than anything before him: Rush for 80, Uppercut, Double Swing and Backhand for 70. Only the Upperbash (90 damage) is unblockable, so a raised guard handles most of the fight and the Upperbash is the one move you must dodge.
He has no weak points and no elemental weakness, and he shrugs off 30% of explosive damage, so plain melee and upgraded firearms are the way through his 2,400 HP. Break his 800 posture for a 500-damage critical attack. Stasis works on him: filling all six segments in one go unlocks the Statue of Insanity achievement.
- Where: Fallen Village, Chapter 3 (Rendezvous); nearest Lantern Orchard, about 47 m away
- HP: 2,400 · Posture: 800 · Critical Attack damage: 500 · Stasis segments: 6
- Attacks: 8 damaging moves, 1 unblockable (Upperbash); hardest hit 90
- Takes from fire: 0 · firearms: −10% · head: ×1
- Reward: 7,000 Catalysts · Achievement: Ultima Ratio Regum (10% of Steam players), Statue of Insanity (0.9% of Steam players)
Full move list, phases and hits-to-kill: The Iron Marshall boss page.
3. Sphinx, Devourer of the Unworthy
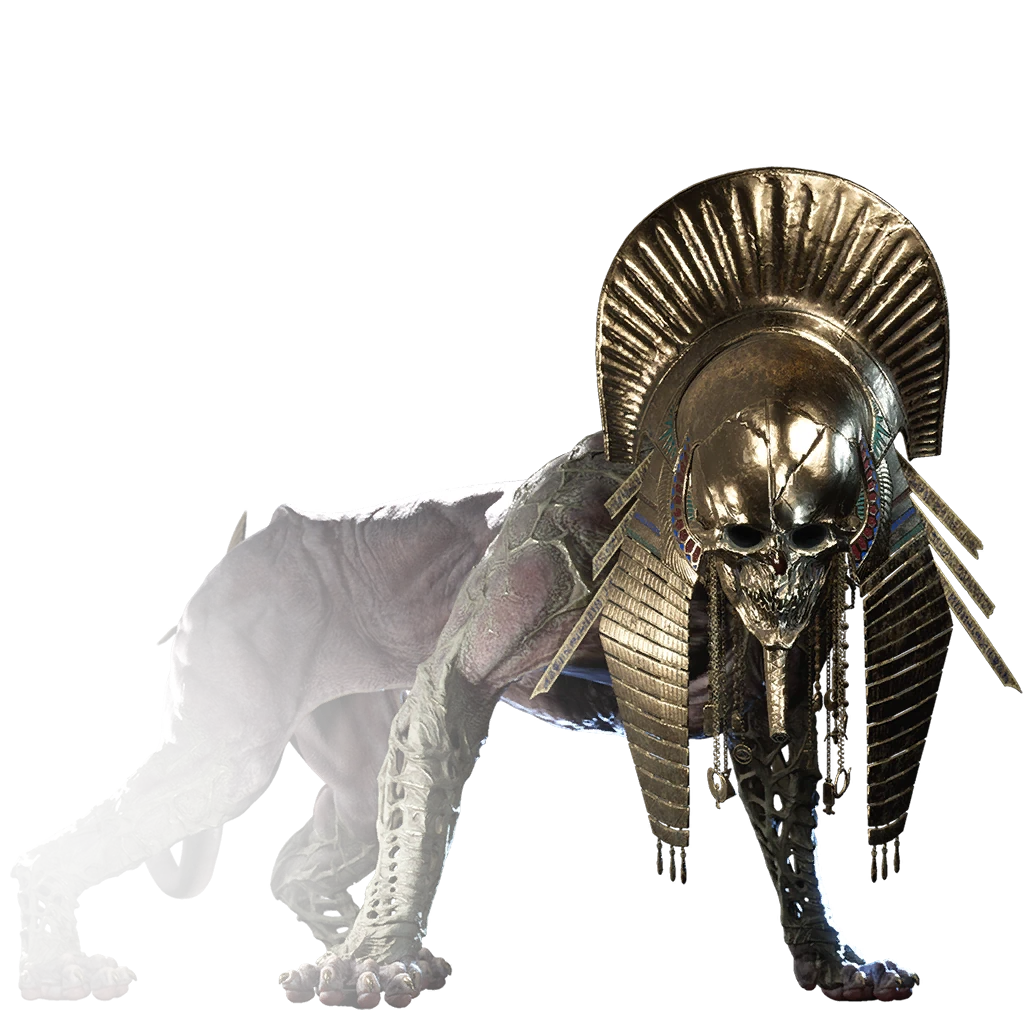
The Sphinx fights in two forms, masked and unmasked, and almost every claw and tail strike builds Crystallization on you, so do not trade hits while the meter is high. Combo 3, Combo 4, the Leap, Vanish and the posture-break slam are unblockable; everything else can be blocked.
It has no elemental weaknesses, and its armoured parts take only 30 to 80% damage, so hit the exposed body. Its posture pool is the smallest of any boss (350), so aggressive parries and charged attacks open it up for critical attacks quickly. The nearest Lantern, Ancient Lair, is a long run of almost 370 m, so bring spare flasks rather than relying on retries.
- Where: Caverns, Chapter 4 (Dark Descent); nearest Lantern Ancient Lair, about 368 m away
- HP: 2,000 · Posture: 350 · Critical Attack damage: 300 · Stasis segments: 5
- Attacks: 14 damaging moves, 5 unblockable (Combo 4, Combo 3, Boss Posture Break, Vanish, Leap); hardest hit 50
- Takes from fire: 0 · firearms: 0 · head: no head weak point
- Reward: 20,000 Catalysts · Achievement: Not a Cat Person (3.2% of Steam players)
Full move list, phases and hits-to-kill: Sphinx boss page.
4. Slaughtermill
Slaughtermill is not a duel: the windmill never swings at you directly. It spawns Carrion slimes, some of them burning, and hurls corpses, across three phases and 3,250 HP. Kill the slimes as they arrive, keep moving to avoid the thrown corpses, and spend the gaps damaging the mill.
It has no posture bar, no Stasis segments and no resistances, so there is no critical-attack opening and every weapon deals full damage. Fire Transmutation and Blunderbuss blasts are good for clearing slime packs. The kill pays 30,000 Catalysts, more than its own Catalyst value.
- Where: Vale of Wrath, Chapter 5 (Crime); nearest Lantern Old Windmill, about 157 m away
- HP: 3,250 · Posture: none · Critical Attack damage: n/a · Stasis segments: none
- Attacks: 0 damaging moves, 0 unblockable; hardest hit —
- Takes from fire: 0 · firearms: 0 · head: no head weak point
- Reward: 30,000 Catalysts · Achievement: Quixotry (2.1% of Steam players)
Full move list, phases and hits-to-kill: Slaughtermill boss page.
5. Anna, the Bride Drowned in Tears
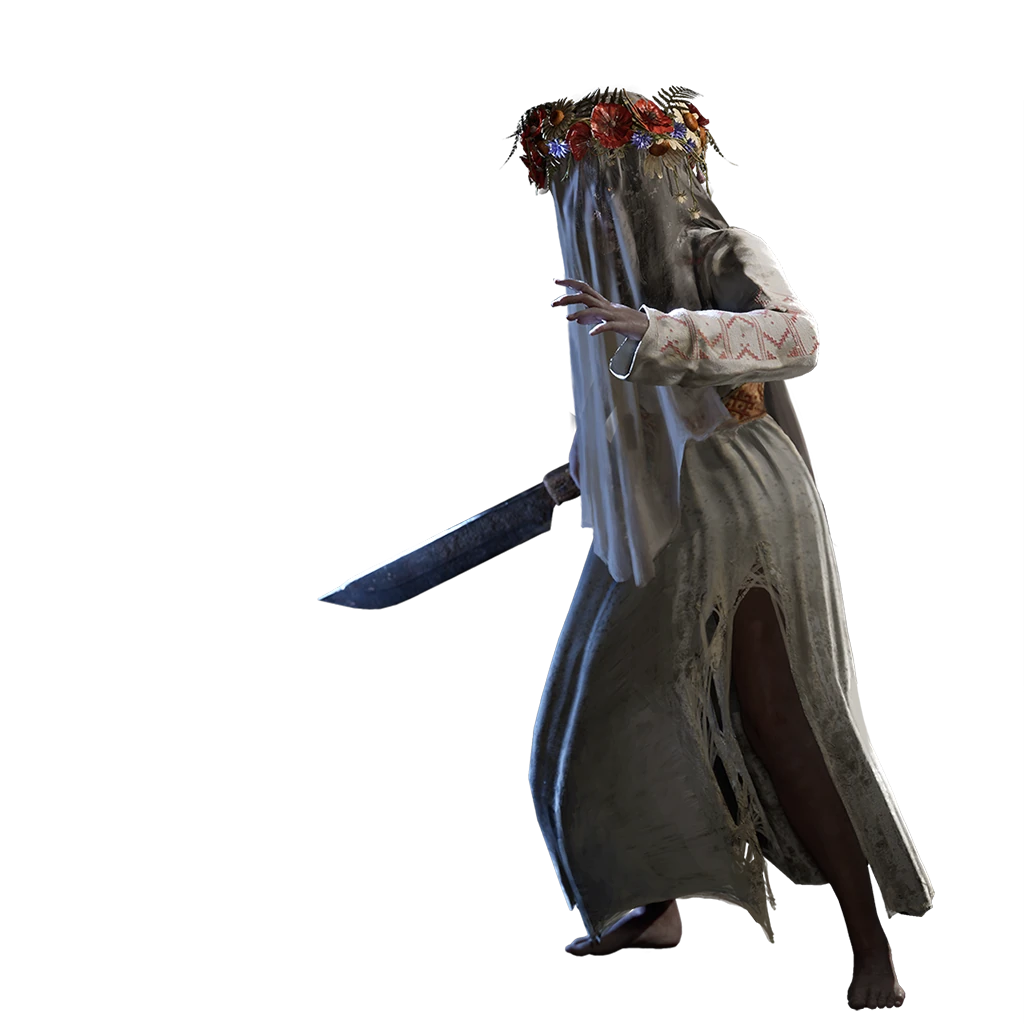
Anna teleports around the arena and summons villagers armed with axes and pitchforks, so the fight is about managing the crowd while hunting her down. Her own sickle slashes hit for 55 and can be blocked; the leaping sickle attack (65) cannot. The axe throwers keep you under fire, so remove them first.
She halves firearm damage and resists half of Ignite build-up, so commit to melee. Her head takes double damage, which rewards aimed charged attacks. Break her 400 posture for a 400-damage critical attack on her 2,200 HP. Her defeat opens the Till Death side quest in Cursed Hollow.
- Where: Cursed Hollow, Chapter 6 (Punishment); nearest Lantern Eerie View, about 136 m away
- HP: 2,200 · Posture: 400 · Critical Attack damage: 400 · Stasis segments: 4
- Attacks: 4 damaging moves, 1 unblockable (Villager Sickle Jump Attack); hardest hit 65
- Takes from fire: −10% · firearms: −50% · head: ×2
- Reward: 14,000 Catalysts · Achievement: My Dying Bride (2.1% of Steam players)
Full move list, phases and hits-to-kill: Anna boss page.
6. High Justicar Aurelius, Last of the Faithful
High Justicar Aurelius is a master fencer: only 1,500 HP, the lowest of any boss, but a 1,000-point posture pool and a fast, varied blade kit. The poke follow-up, backstep cut, Nephtoglobin leap and slam, his grab (70 damage, his hardest hit) and his pistol shot are all unblockable, so expect to dodge more than you block.
His masked head takes only half damage while his chest and groin take 20% extra, so aim centre mass. He has no elemental weaknesses, so use your best-upgraded blade. Beating him unlocks the True Oath achievement.
- Where: The Outskirts, Chapter 7 (Witch Hunt); nearest Lantern Breach, about 32 m away
- HP: 1,500 · Posture: 1,000 · Critical Attack damage: 200 · Stasis segments: 5
- Attacks: 14 damaging moves, 5 unblockable (Melee Grab, Nephto Leap, Poke Followup, Backstep, Nephto Slam); hardest hit 70
- Takes from fire: 0 · firearms: 0 · head: ×0.5
- Reward: 18,000 Catalysts · Achievement: True Oath (2% of Steam players)
Full move list, phases and hits-to-kill: High Justicar Aurelius boss page.
7. Experiment 83
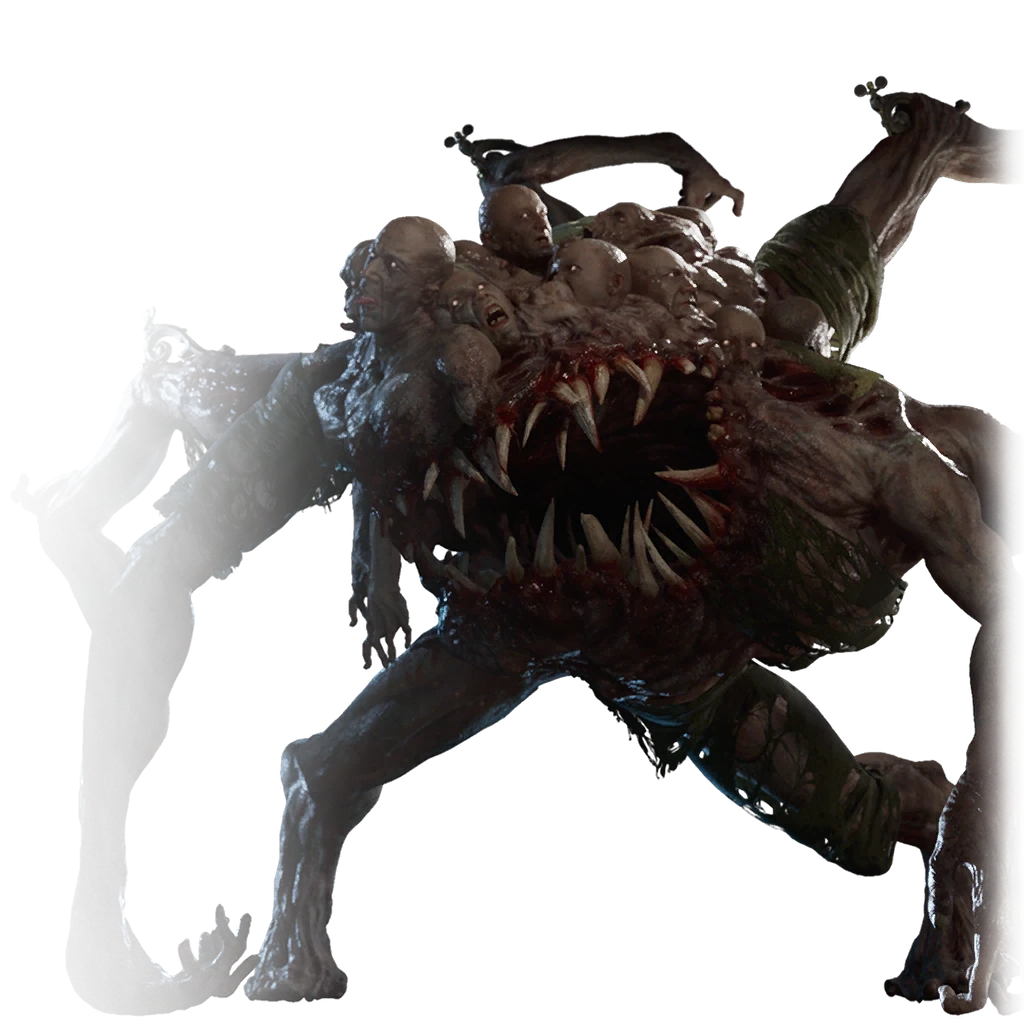
Experiment 83 has few moves but one of the hardest hits in the game: the Unfair Slam deals 120 and cannot be blocked, so treat every slam wind-up as a signal to dodge. The Triple Swipe (50) and Rage flurry (45) can be blocked.
Its head takes 50% extra damage and its limbs only 80%, and it takes 20% extra from fire, so the Fire Transmutation and headshots are the efficient route through its 3,400 HP. Its posture pool is 1,000, but the reward is huge: a critical attack after a posture break deals 1,000 damage, almost a third of its health.
- Where: The Outskirts, Chapter 7 (Witch Hunt); nearest Lantern Lighthouse, about 35 m away
- HP: 3,400 · Posture: 1,000 · Critical Attack damage: 1,000 · Stasis segments: 5
- Attacks: 4 damaging moves, 2 unblockable (Unfair Slam, Melee Grab); hardest hit 120
- Takes from fire: +20% · firearms: 0 · head: ×1.5
- Reward: 20,000 Catalysts · Achievement: Lament of the Limbs (1.8% of Steam players)
Full move list, phases and hits-to-kill: Experiment 83 boss page.
8. The Orphan
The Orphan is the most aggressive fight so far: 4,000 HP and a long list of combos, many of them unblockable, including the Pipe swing (100 damage), the five-hit combos and the phase-two combo enders. Its grab also infects you. Expect to dodge, not block.
Do not count on fire here. The Orphan resets its fire weakness to 0% in both phases, so fire deals normal damage, and it resists 70% of Ignite build-up on top. Bring your best-upgraded weapon and aim for its head, which takes double damage while its legs take less. It is immune to Infection. Its 1,550 posture is high, but a critical attack deals 700. The nearest Lantern, Sewage Drain, is only about 40 m away.
- Where: University, Chapter 9 (In Ruins); nearest Lantern Sewage Drain, about 39 m away
- HP: 4,000 · Posture: 1,550 · Critical Attack damage: 700 · Stasis segments: 6
- Attacks: 16 damaging moves, 7 unblockable (Pipe, Phase 2 Combo (right), Combo Five Hit, Phase 2 Combo (left), Swing Fake, Leap Scream, …); hardest hit 100
- Takes from fire: 0 · firearms: 0 · head: ×2
- Reward: 40,000 Catalysts · Achievement: Coup de Grâce (1.5% of Steam players)
Full move list, phases and hits-to-kill: The Orphan boss page.
9. Captain Raphael of the Nephtis Superioris
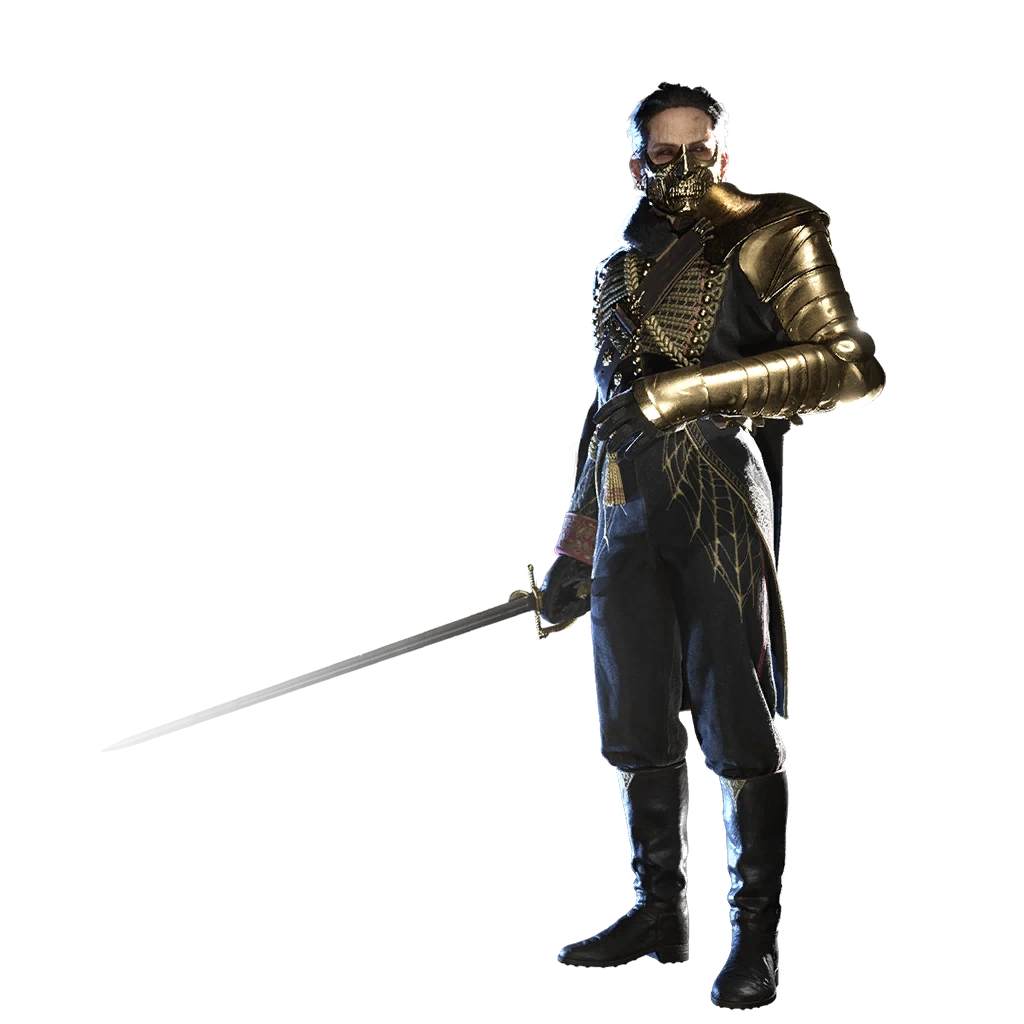
Captain Raphael has the biggest posture pool of any boss (2,000) and 4,000 HP. His unblockable hits are the heaviest in his kit: an Explosion for 100, a Heavy strike for 80 and a Fire Slash (70) that also Ignites you. The rest of his slices, pokes and jukes can be blocked or parried.
He resists 30% of firearm damage, so lean on melee, and his head takes double damage. He has no elemental weakness. The kill pays 50,000 Catalysts, the largest boss reward, and unlocks the Behemoth achievement.
- Where: Fortress, Chapter 10 (Shackled); nearest Lantern High Tower, about 36 m away
- HP: 4,000 · Posture: 2,000 · Critical Attack damage: 600 · Stasis segments: 5
- Attacks: 10 damaging moves, 3 unblockable (Explosion, Heavy, Fire Slash); hardest hit 100
- Takes from fire: 0 · firearms: −30% · head: ×2
- Reward: 50,000 Catalysts · Achievement: Behemoth (1.5% of Steam players)
Full move list, phases and hits-to-kill: Captain Raphael of the Nephtis Superioris boss page.
10. Entity, Voice of the Void
Entity, Voice of the Void, is the final boss: 5,000 HP, its own teleports, dashes and revolver, plus echoes of earlier bosses (General Lothaire, the Orphan and the Sphinx) that bring their signature attacks back. Its own Combo 1 (80) and Combo 5 are unblockable, as are the teleport gap-closer and many of the borrowed moves.
It has no elemental weaknesses. Its head takes 50% extra damage and its limbs less, and a critical attack after breaking its 700 posture deals 1,200 damage, the biggest critical of any boss. Lessons from the earlier fights apply directly: dodge the same red attacks you learned against Lothaire, the Orphan and the Sphinx.
- Where: Entropy, the final region
- HP: 5,000 · Posture: 700 · Critical Attack damage: 1,200 · Stasis segments: 5
- Attacks: 19 damaging moves, 6 unblockable (Combo 1, Melee Grab, Teleport Gapcloser, Teleport Away, Visceral Ability, Flamethrower); hardest hit 80
- Takes from fire: 0 · firearms: 0 · head: ×1.5
- Reward: 100,000 Catalysts · Achievement: In His Own Image (1.5% of Steam players)
Full move list, phases and hits-to-kill: Entity boss page.
Boss difficulty ranking
Difficulty is personal, so treat this as a starting point. We rank bosses with a threat index: HP × the average damage of their attacks, weighted up by the share of those attacks that are unblockable. It ignores arena layout and how readable a move is, and it leaves out Slaughtermill, which never strikes you directly.
| Rank | Boss | HP | Hardest hit | Unblockable share | Threat index |
|---|---|---|---|---|---|
| 1 | Entity, Voice of the Void | 5,000 | 80 | 32% | 414 |
| 2 | The Orphan | 4,000 | 100 | 44% | 345 |
| 3 | Captain Raphael of the Nephtis Superioris | 4,000 | 100 | 30% | 335 |
| 4 | Experiment 83 | 3,400 | 120 | 50% | 312 |
| 5 | The Iron Marshall | 2,400 | 90 | 13% | 165 |
| 6 | Anna, the Bride Drowned in Tears | 2,200 | 65 | 25% | 144 |
| 7 | General Lothaire, the Eagle-Bearer | 1,800 | 50 | 50% | 109 |
| 8 | High Justicar Aurelius, Last of the Faithful | 1,500 | 70 | 36% | 83 |
| 9 | Sphinx, Devourer of the Unworthy | 2,000 | 50 | 36% | 80 |
Read the index alongside the posture numbers. High Justicar Aurelius ranks low because he has the least HP (1,500), but his 1,000-point posture pool and five unblockable moves make him a technical fight. The Sphinx ranks near the bottom on raw numbers, but its Crystallization build-up and the 368 m run back from the Ancient Lair Lantern make each attempt costly. At the top, Entity combines the most HP (5,000) with 59 borrowed moves from earlier bosses.
Weaknesses and resistances
| Boss | Fire | Firearms | Explosive | Ignite build-up | Head | Immune to |
|---|---|---|---|---|---|---|
| General Lothaire | +40% | 0 | 0 | −30% | ×2 | — |
| The Iron Marshall | 0 | −10% | −30% | −50% | ×1 | — |
| Sphinx | 0 | 0 | 0 | 0 | — | — |
| Slaughtermill | 0 | 0 | 0 | 0 | — | — |
| Anna | −10% | −50% | 0 | −50% | ×2 | — |
| High Justicar Aurelius | 0 | 0 | 0 | 0 | ×0.5 | — |
| Experiment 83 | +20% | 0 | 0 | −50% | ×1.5 | — |
| The Orphan | 0 | 0 | 0 | −70% | ×2 | Infection |
| Captain Raphael of the Nephtis Superioris | 0 | −30% | 0 | −45% | ×2 | — |
| Entity | 0 | 0 | 0 | −60% | ×1.5 | — |
Firearms are the weak option against Anna (she halves them), Captain Raphael (−30%) and the Iron Marshall (−10%). Headshots are worth aiming for on General Lothaire, Anna, the Orphan and Captain Raphael (all ×2), while High Justicar Aurelius's masked head takes only half damage, so aim for his chest (×1.2) instead.
Get the Winning Edge
Real-time overlays, automatic match tracking, and exclusive tools — everything you need to climb, free on your PC.
- In-game overlays
- Automatic match tracking
- Desktop-exclusive tools
Help us maintain accuracy! If you notice incorrect stats, missing data, or any issues, your feedback directly improves the quality of our data for the entire community.
Guide FAQ
How many bosses are in Valor Mortis?
10: General Lothaire, The Iron Marshall, Sphinx, Slaughtermill, Anna, High Justicar Aurelius, Experiment 83, The Orphan, Captain Raphael of the Nephtis Superioris, Entity.
Who is the first boss in Valor Mortis?
General Lothaire, the Eagle-Bearer, fought on the Battlefield in Chapter 1 (Revival). He has 1,800 HP, a 500 posture pool, and takes 40% extra damage from fire and double damage to the head.
Who is the final boss of Valor Mortis?
Entity, Voice of the Void, fought in Entropy. It has 5,000 HP, the biggest Critical Attack payoff (1,200 damage), and echoes of General Lothaire, the Orphan and the Sphinx that bring back their attacks.
What is the hardest boss in Valor Mortis?
On our threat index it is Entity, followed by The Orphan and Captain Raphael of the Nephtis Superioris. Sphinx ranks as the easiest.
Which boss gives the most Catalysts?
Captain Raphael of the Nephtis Superioris pays 50,000 Catalysts on the kill screen, followed by the Orphan (40,000) and Slaughtermill (30,000). Entity's data lists a value of 100,000 Catalysts.
Which Valor Mortis bosses are weak to fire?
General Lothaire (+40% fire damage) and Experiment 83 (+20%). The Orphan's base stats list a fire weakness, but both phases of the fight reset it to 0%, so fire deals normal damage to it. The Orphan is also immune to Infection.